MAKE YOUR TOY ASTRONOMICAL TYPE TELESCOPE
MAKE YOUR TOY
ASTRONOMICAL TYPE TELESCOPE
Nikunja Bihari
Sahu
Telescope (Refracting astronomical type):
A
telescope is a device that shows a distant object in magnified form. The
telescope was first invented by a Dutch lens-maker Hans Lippershey in 1608. He
believed that the telescope can be potentially used as a spyglass to detect
pirates in the ships going along the seas. However, it was the Italian
astronomer Galileo who first pointed his telescope skyward for astronomical investigations
in 1609.
A telescope primarily consists of two lenses;
i.e. an Objective Lens and an Eyepiece Lens. The Angular Magnification of a Telescope
is the ratio of the focal length of the Objective lens to the focal lens of the
Eyepiece lens. The Angular Magnification of a Telescope is defined as the ratio of
the angle subtended at the eye by the final image formed by the optical
instrument to the angle subtended at the eye by the object when not viewed
through the instrument. This is given by the following formula:
M =
fo/fe
Where
M= Angular
Magnification of the Telescope
fo = Focal length of
the Objective Lens, and
fe
= Focal length of the Eyepiece Lens
The
Tube length (L) of the Telescope (when the Object distance for the Eyepiece
matches with its focal length) is given by the formula:
L=
fo + fe
We
will make a small Refractive telescope having 3x Magnification. An astronomical
telescope always produces inverted image, as there is no harm in viewing a
celestial object like a star or a planet or the Moon upside down.
Materials Required:
1.
Double Convex Lens ( f= 30 cm, Dia= 50 cm) to serve as the Objective
2.
Double Convex Lens ( f= 10 cm, Dia= 50 cm) to serve as the Eyepiece
3.
Black Cardboard Paper
4.
Cellotape
Construction:
Roll the Cardboard sheet to form a
cylinder of 50 mm in diameter and glue the edges with the help of cellotape so
that the tube remains sturdy in shape. Fit the Objective lens at one end of this
cylinder with the help of cellotape. Prepare a second cylinder using the same
cardboard sheet by rolling it over the first cylinder so that the first
cylinder can be tightly pushed into it and slide freely to and fro. Attach the Eyepieces
lens at one end of this second cylinder again with the help of cellotape. Now,
push the Eyepiece cylinder into the Objective cylinder so that the Eyepiece
lens remains outside for the observer to place his/her eyes to view. Our kit is
now ready for operation. Care should be taken to keep the lens surface free
from any dust, oil or dirt and, hence, direct contact of the lens surface with
hand should be avoided.
How
does it Work
The Objective lens produces a real, inverted
and diminished image of a distant object in its focal plane. The position of
the Eyepiece lens is adjusted so that the image is formed within the focal
length of the Eyepiece. The image produced by the Objective lens acts as an
object for the Eyepiece lens which magnifies the image to produce a final
image. The final image produced after the light rays refracted from the
Eyepiece lens is Inverted, Virtual and Magnified.
How
Do You Go
Point
the telescope to a distant object so that the Objective lens remains towards
the object and look through the Eyepiece. Slide the Eyepiece cylinder over the
Objective cylinder to and fro so as to vary the distance between the two lenses
till the image looks sharper. The final image will be virtual, inverted and
magnified.
Caution:
Never
look to the Sun with telescope. It might permanently impair your vision by damaging
the eyes!
Further
Scope
You will soon realize that this telescope
is not free from various optical aberrations like Spherical aberration and
Chromatic aberration. Spherical aberration arise due to the fact that the
Paraxial rays and the Marginal rays, after refraction through the lens, don't come to the focus at the same point on
the Principal axis of the lens. This aberration can be minimized by using an
Aperture Stop for the Objective Lens. In this arrangement, a black coloured Paper
ring can be put over the Objective lens reducing its aperture to only one-third.
This results in the fact that most of the marginal rays are blocked allowing
only paraxial rays to pass through the Objective lens. In this case, although
the image will be fainter, it will be much clearer.
Similarly, the telescope also suffers from
Chromatic aberration and the final image is bordered by coloured fringes.
Chromatic aberration arises because of the failure of all the wavelengths of
the visible light to come to a common focus, as the Refractive Index of lights of different colours are different for
a given refracting medium like glass. In professional telescope, an Objective
lens incorporating an Achromatic doublet is generally used to minimise the
effects due to Chromatic aberration which is a complicated technology beyond
the reach of common people. Hence, in our telescope, the Chromatic aberration
cannot be eliminated in part or full and, hence, the final image will look
surrounded by coloured spectrum.
PHOTOGRAPHS
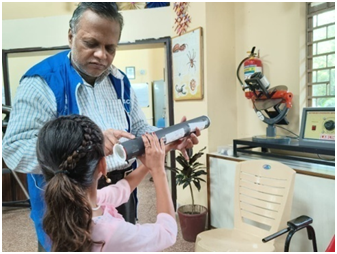
A girl testing her telescope by adjusting the distance between the two lenses in a Telescope Making Workshop
Ray
diagram for an Astronomical telescope
A 4" astronomical telescope is used to view the
four Galilean moons of Jupiter using an Objective lens of focal length 660 mm
and an Eyepiece having focal length 25 mm, adjusted to yield a Magnification of
26.4
Education
Officer
Regional
Science Centre
Bhopal


Comments
Post a Comment